Goblet with captive rings in Yew
There are different tales in folklore about these goblets, however one says that in 17th Century Ireland when a young man fell in love, he carved a goblet as a present to his intended. He carved the goblet, with two captive rings, all from a single piece of wood. These two rings symbolized unity and eternity. At their wedding feast they both drank from the goblet and thereafter kept it in a safe place for, so long as the rings remained unbroken they would love each other for ever. They are still given now as wedding gifts but also for other occasions such as anniversaries. They also provide a talking point as people try to work out how they are made without joins.
To illustrate the technique I made one in Yew. When making goblets I have a simple design approach – if the wood has interesting grain or colour variation then the goblet has a fairly simple shape as here. If the wood is straight grained and evenly coloured then I add more beads and coves for interest.
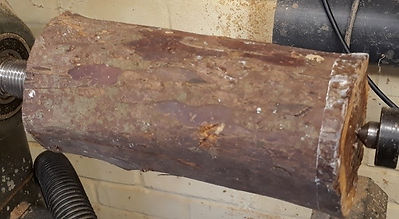
Yew branch wood – about 18 cm long by 8 cm diameter. There was a small split at one end that was removed in the turning. It was turned round and a tenon formed ay one end.
Tip: Make the tenon shaped to fit the dovetail profile of the jaws. Also - the tenon should have a diameter a fraction bigger than the true minimum diameter of the jaws - calipers help here but after an accident I always turn the lathe off before using the calipers to check the diameter of the tenon. When inserted into the chuck, the wood should not ‘bottom out’ on the base.
After turning round with a roughing gouge, I work on the cup outer shape first, leaving the bottom untouched and avoiding undercutting the cup too much at this stage – this keeps the cup end stable. I normally start by using a Forstner bit to hollow out vases, goblets and similar – it shortens the time taken and I can bore down to the required depth. Once much of the cup has been removed in this way I can hollow out the rest – I finish off using a side scraper. Different people may well use different tools.
Once the hollowing is complete and sanded, I finish off the outside profile of the cup keeping the wall thickness even. I tend to err on the thicker side compared to other people. This makes the goblet a little chunky but maybe that would have been typical of real goblets
I finish the cup end off completely to 400 grit before working on the stem and base. Even though the branch has been drying for 5 years I still expect it to warp a little and when the stem has been narrowed, released stress may cause the neck to move a tad meaning it would be impossible later to rework the cup.
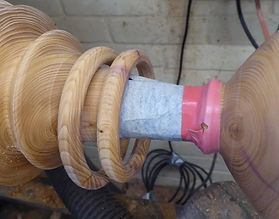
Initially you use a wide parting tool to cut the body of the ring, then shape the outer part and use the captive ring tool to cut out the back and eventually produce a free ring.
It is possible to use a thin parting tool or even a skew to cut the rings but I found this difficult when I tried this some years ago – if a ring breaks or is poorly sized you may not have much material left in the stem to make another. For this reason, I bought a captive ring tool - see image on right. It encourages you to make consistent diameter rings every time and also makes the cutting at the back much easier.
A second ring is produced in the same way and then the stem is reduced in diameter and shaped to suit.
Once the two rings are loose the insides can be sanded and shaped – taping some sandpaper to the stem and then holding the rings by hand while the lathe is turning slowly is a good way of sanding the inside of the rings. When you are happy, they can be taped out of the way while the stem is taken to the final shape. Again, it is a good idea to work on the parts furthest from the chuck first so you always have some solid wood on the left to keep it from wobbling.
When you are happy that as much finishing is done as is possible on the lathe, the base can be parted. I chose to complete the bottom by hand rather than risk putting it back on the lathe and using a jam chuck in the cup.
Cup with 4 coats of oil left to cure for a few days and then polished with wax.
Safety note: This is a decorative and display piece – Yew is poisonous.